In the previous post, I wrote about the steps I followed when getting started with the RESTEasy framework.
In this post, I'll walk you through the steps I followed when embedding Jetty and packaging a RESTful API as a fat JAR (a fat JAR or uber-JAR is a JAR file that contains all of a project's class files and resources packaged together with all of it's dependencies).
Prerequisites
- OpenJDK for Java 1.8
- Git
- Maven (I'm using 3.3.9)
- The Eclipse IDE for Java EE Developers (I'm using Neon)
Note: This post will walk you through the steps required to install the OpenJDK. And, this post will walk you through the steps required to install Git, Maven and the Eclipse IDE.
Create a scaffold
Let's use Maven's quickstart archetype to create the scaffolding for our project:
mvn archetype:generate \
  -DarchetypeArtifactId=maven-archetype-quickstart \
  -DarchetypeVersion=1.1 \
  -DgroupId=org.robferguson.resteasy.examples.fatjar \
  -DartifactId=fatjar \
  -DarchetypeRepository=local \
  -DinteractiveMode=false
The Eclispe IDE
Follow the steps in this post to import the template into the Eclispe IDE.
Creating a Resource
We can reuse the MessageResource class from the previous post (we just need to refactor the package name):
...

@Path("/hello")
@Produces(MediaType.TEXT_PLAIN)
public class MessageResource {

  @GET
  @Path("/{param}")
  public Response printMessage(@PathParam("param") String msg) {
    String result = "Hello " + msg + "!";
    return Response.status(200).entity(result).build();
  }
}
Registering a Resource
We can reuse the HelloWorldApplication class from the previous post (we just need to refactor the package name, the class name and the constructor name):
...

public class FatJarApplication extends Application {

  public FatJarApplication() {}

  @Override
  public Set<Object> getSingletons() {
    HashSet<Object> set = new HashSet<Object>();
    set.add(new MessageResource());
    return set;
  }
}
Note: I hope you noticed that we're not using the @ApplicationPath annotation, that's because we are going to set the application path ("/api") using an initialisation parameter in our Main class (see below).
Embedding Jetty
Jetty has a slogan, 'Don’t deploy your application in Jetty, deploy Jetty in your application!'. What this means is that Jetty can be instantiated and used in a Java program just like any plain old java object.
To embed Jetty we need to create a server instance, configure the server and then start the server. We also need to provide an entry point (i.e., a main method) for our application:
package org.robferguson.resteasy.examples.fatjar;

import org.eclipse.jetty.server.Server;
import org.eclipse.jetty.servlet.DefaultServlet;
import org.eclipse.jetty.servlet.ServletContextHandler;
import org.eclipse.jetty.servlet.ServletHolder;
import org.jboss.resteasy.plugins.server.servlet.HttpServletDispatcher;

public class Main {

  static final String APPLICATION_PATH = "/api";
  static final String CONTEXT_ROOT = "/";

  public Main() {}

  public static void main( String[] args ) throws Exception
  {
    try
    {
      new Main().run();
    }
    catch (Throwable t)
    {
      t.printStackTrace();
    }
  }

  public void run() throws Exception
  {
    final int port = 8080;
    final Server server = new Server(port);

    // Setup the basic Application "context" at "/".
    // This is also known as the handler tree (in Jetty speak).
    final ServletContextHandler context = new ServletContextHandler(
      server, CONTEXT_ROOT);

    // Setup RESTEasy's HttpServletDispatcher at "/api/*".
    final ServletHolder restEasyServlet = new ServletHolder(
      new HttpServletDispatcher());
    restEasyServlet.setInitParameter("resteasy.servlet.mapping.prefix",
      APPLICATION_PATH);
    restEasyServlet.setInitParameter("javax.ws.rs.Application",
      "org.robferguson.resteasy.examples.fatjar.FatJarApplication");
    context.addServlet(restEasyServlet, APPLICATION_PATH + "/*");

    // Setup the DefaultServlet at "/".
    final ServletHolder defaultServlet = new ServletHolder(
      new DefaultServlet());
    context.addServlet(defaultServlet, CONTEXT_ROOT);

    server.start();
    server.join();
  }
}
We're configuring Jetty in our code so we don't require a WEB-INF/web.xml.
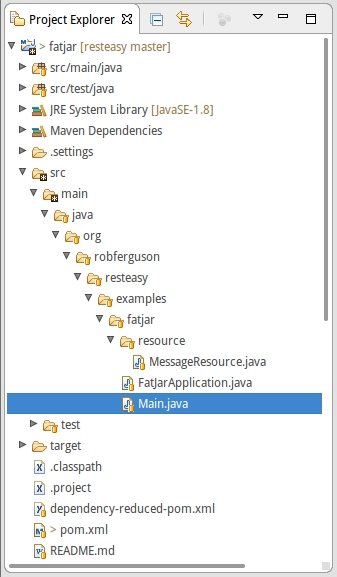
Here's how the project should look in Eclipse's Project Explorer:
The POM.XML
Let’s take a look at the Fat JAR example's pom.xml:
<groupId>org.robferguson.resteasy.examples.fatjar</groupId>
<artifactId>fatjar</artifactId>
<version>1.0-SNAPSHOT</version>
<packaging>jar</packaging>
The first few elements — the groupId, artifactId, version and packaging — are known as the Maven coordinates, and they uniquely identify a project. The packaging element tells Maven that this project will build a JAR file.
<properties>

  ...

  <resteasy.version>3.0.19.Final</resteasy.version>
  <junit.version>4.11</junit.version>
  <servlet-api.version>3.1.0</servlet-api.version>
  <jetty.version>9.3.14.v20161028</jetty.version>

  ...

</properties>
Maven properties are value placeholders, their values are accessible anywhere within a POM using the following notation: ${X} (e.g., ${jetty.version}).
<dependencies>

  <!-- RESTEasy runtime dependencies -->
  <dependency>
    <groupId>org.jboss.resteasy</groupId>
    <artifactId>resteasy-jaxrs</artifactId>
    <version>${resteasy.version}</version>
  </dependency>
  <dependency>
    <groupId>org.jboss.resteasy</groupId>
    <artifactId>resteasy-servlet-initializer</artifactId>
    <version>${resteasy.version}</version>
  </dependency>

  <!-- Jetty runtime dependencies -->
  <dependency>
    <groupId>javax.servlet</groupId>
    <artifactId>javax.servlet-api</artifactId>
    <version>${servlet-api.version}</version>
  </dependency>
  <dependency>
    <groupId>org.eclipse.jetty</groupId>
    <artifactId>jetty-servlet</artifactId>
    <version>${jetty.version}</version>
  </dependency>

  ...

</dependencies>
The dependencies element lists all the library dependencies the project needs to compile and run. The Fat JAR example is dependent on RESTEasy (the core library and the ServletContainerInitializer integration library), the Java Servlet API library and Jetty's servlet library.
The build element contains configuration information that defines how Maven should build the project:
<build>
    <finalName>fatjar-${project.version}</finalName>
The first item is the finalName element, which is used to name the project's JAR file.
Next we have the plugins element, this section contains information about the Maven plugins that will be used to build the project:
    <plugins>

      ...

      <plugin>
        <groupId>org.apache.maven.plugins</groupId>
        <artifactId>maven-shade-plugin</artifactId>
        <version>${maven-shade-plugin.version}</version>
        <configuration>
          <createDependencyReducedPom>
            true
          </createDependencyReducedPom>
          <filters>
            <filter>
              <artifact>*:*</artifact>
              <excludes>
                <exclude>META-INF/*.SF</exclude>
                <exclude>META-INF/*.DSA</exclude>
                <exclude>META-INF/*.RSA</exclude>
              </excludes>
            </filter>
          </filters>
        </configuration>
        <executions>
          <execution>
            <phase>package</phase>
            <goals>
              <goal>shade</goal>
            </goals>
            <configuration>
              <transformers>
                <transformer implementation=
                  "...shade.resource.ServicesResourceTransformer"/>
                <transformer implementation=
                  "...shade.resource.ManifestResourceTransformer">
                  <mainClass>
                    org.robferguson.resteasy.examples.fatjar.Main
                  </mainClass>
                </transformer>
              </transformers>
            </configuration>
          </execution>
        </executions>
      </plugin>

      ...

    </plugins>
  </build>
The maven-shade plugin is responsible for packaging our application as a fat JAR (and where required to shade (i.e., rename) it's dependencies).
Build and run the example program
The best way to learn about the RESTEasy framework is to build and run example programs. Lets start by cloning my RESTEasy examples repository:
git clone https://github.com/Robinyo/resteasy.git
Then we can build the 'Fat JAR' example (in the examples/fatjar directory) and run some tests:
mvn clean install
To run the example:
java -jar target/fatjar-1.0-SNAPSHOT.jar
You should see output like:
2016-12-06 15:24:08.011:INFO::main: Logging initialized @219ms
2016-12-06 15:24:08.157:INFO:oejs.Server:main: jetty-9.3.z-SNAPSHOT
Dec 06, 2016 3:24:08 PM org.jboss.resteasy.spi.ResteasyDeployment
INFO: RESTEASY002225: Deploying javax.ws.rs.core.Application: class
  org.robferguson.resteasy.examples.fatjar.FatJarApplication
Dec 06, 2016 3:24:08 PM org.jboss.resteasy.spi.ResteasyDeployment
INFO: RESTEASY002220: Adding singleton resource
  org.robferguson.resteasy.examples.fatjar.resource.MessageResource
    from Application class
      org.robferguson.resteasy.examples.fatjar.FatJarApplication
2016-12-06 15:24:08.726:INFO:oejsh.ContextHandler:main: Started
  o.e.j.s.ServletContextHandler@3a5ed7a6{/,null,AVAILABLE}
2016-12-06 15:24:08.776:INFO:oejs.AbstractConnector:main: Started
  ServerConnector@50ffd483{HTTP/1.1,[http/1.1]}{0.0.0.0:8080}
2016-12-06 15:24:08.784:INFO:oejs.Server:main: Started @994ms
In your browser navigate to:
http://localhost:8080/api/hello/World
You should see output like:

References:
- Maven Docs: Apache Maven Shade Plugin
- Jetty Docs: Embedding Jetty
- Jetty Project (GitHub): Example of an Uber JAR (Fat JAR) to start a server using Embedded Jetty
- Jetty Project (GitHub): Short examples of various features of Embedded Jetty
Source Code:
- GitHub: Getting started with RESTEasy