The Java API for RESTful web services (JAX-RS) is a Java language specification that simplifies the development and deployment of RESTful web services. RESTEasy is JBoss's implementation of the JAX-RS specification.
In this post, I will walk you through the steps I followed when getting started with the RESTEasy framework.
Prerequisites
- OpenJDK for Java 1.8
- Git
- Maven (I'm using 3.3.9)
- The Eclipse IDE for Java EE Developers (I'm using Neon)
Note: This post will walk you through the steps required to install the OpenJDK. And, this post will walk you through the steps required to install Git, Maven and the Eclipse IDE.
What is an Archetype?
An archetype is "an original pattern or model from which all other things of the same kind are made". We can use Maven's quickstart archetype to create a template for our project:
mvn archetype:generate \
  -DarchetypeArtifactId=maven-archetype-quickstart \
  -DarchetypeVersion=1.1 \
  -DgroupId=org.robferguson.resteasy.examples.helloworld \
  -DartifactId=helloworld \
  -DarchetypeRepository=local \
  -DinteractiveMode=false
Note: For line continuation to work the backslash ('\') must be the very last character before the end of line character, if there is a space after the '\', the line continuation will not work.
You should see output like:
[INFO] Scanning for projects...
[INFO] ----------------------------------------------------------------
[INFO] Generating project in Batch mode
[INFO] ----------------------------------------------------------------
[INFO] Parameter: packageName, Value: helloworld
[INFO] Parameter: version, Value: 1.0-SNAPSHOT
[INFO] ----------------------------------------------------------------
[INFO] BUILD SUCCESS
[INFO] ----------------------------------------------------------------
[INFO] Total time: 7.316 s
[INFO] Finished at: 2016-11-26T09:49:24+11:00
[INFO] Final Memory: 18M/121M
[INFO] ----------------------------------------------------------------
The Eclispe IDE
Now we can import the template into the Eclispe IDE, select 'File -> Import...':

Select 'Existing Maven Projects', then click the Next button:
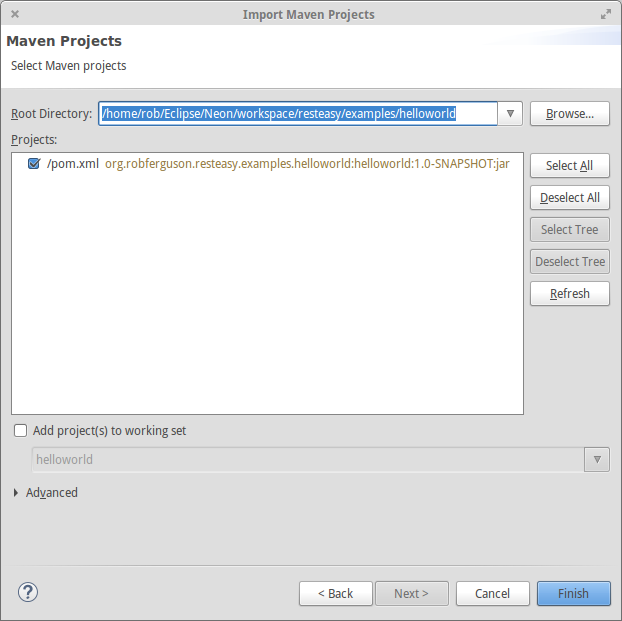
Select the project's root directory, click the Finish button, then take a look at the project's structure in the Project Explorer:

Creating a Resource
Now we're ready to create our first resource, lets take a look at a simple example:
...

@Path("/hello")
@Produces(MediaType.TEXT_PLAIN)
public class MessageResource {

  @GET
  @Path("/{param}")
  public Response printMessage(@PathParam("param") String msg) {
    String result = "Hello " + msg + "!";
    return Response.status(200).entity(result).build();
  }
}
JAX-RS relies heavily on annotations to simplify the development of RESTful web services. The @Path annotation specifies the relative path (i.e., "/hello") for a resource class or method. The @GET annotation specifies the HTTP request type and the @PathParam annotation binds the method parameter to a path segment (e.g., "World").
Registering a Resource
We can extend the javax.ws.rs.core.Application class in order to tell RESTEasy which resources we want deployed.
Let’s take a look at a simple example:
...

@ApplicationPath("")
public class HelloWorldApplication extends Application {

  public HelloWorldApplication() {}

  @Override
  public Set<Object> getSingletons() {
	HashSet<Object> set = new HashSet<Object>();
	set.add(new MessageResource());
    return set;
  }
}
The Application class is very straightforward, it lists the classes and objects that JAX-RS is supposed to deploy. It also includes the @ApplicationPath(“”) annotation which defines the relative base URL path (e.g., @ApplicationPath("") -> http://localhost:8080 or @ApplicationPath("api") -> http://localhost:8080/api) for all our JAX-RS services.
The getSingletons() method returns a list of preallocated (i.e., objects that you have created) JAX-RS web services and providers. The RESTEasy runtime will iterate through the list of objects and register them internally. When the objects are registered, RESTEasy will also inject values for @Context annotated fields and setter methods.
Deployment
RESTEasy applications can be deployed to a servlet container like Jetty or Tomcat or to a JEE application server like JBoss Wildfly or IBM Websphere. They can be packaged in a WAR or as a fat JAR.
To deploy a RESTEasy application to a JAX-RS-aware servlet container we only need a very minimal web.xml file:
<?xml version="1.0" encoding="UTF-8"?>
<web-app xmlns="http://java.sun.com/xml/ns/javaee"
         xmlns:xsi="http://www.w3.org/2001/XMLSchema-instance"
         xsi:schemaLocation=http://java.sun.com/xml/ns/javaee
           http://java.sun.com/xml/ns/javaee/web-app_3_0.xsd
             version="3.0">
</web-app>
If you have at least one Application class implementation annotated with @ApplicationPath, a JAX-RS–aware servlet container will deploy your application by using the Servlet 3.0 ServletContainerInitializer Service Provider Interface (SPI).
The POM.XML
The Project Object Model contains everything we need to know about a project (the "who", "what", and "where") including the plugin configurations used during the build process (the "when" and "how").
Note: Maven favours convention over configuration which means it will look for code to compile in the src/main/java directory, for the web.xml file in the src/main/webapp directory, and for tests in the src/test/java directory.
Let’s take a look at the Hello World example's pom.xml:
<groupId>org.robferguson.resteasy.examples.helloworld</groupId>
<artifactId>helloworld</artifactId>
<version>1.0-SNAPSHOT</version>
<packaging>war</packaging>
The first few elements — the groupId, artifactId, version and packaging — are known as the Maven coordinates, and they uniquely identify a project.
<properties>
  ...
  <resteasy.version>3.0.19.Final</resteasy.version>
  <junit.version>4.11</junit.version>
  ...
</properties>
Maven properties are value placeholders, their values are accessible anywhere within a POM using the following notation: ${X} (e.g., ${resteasy.version}).
<dependencies>

  <!-- Runtime dependencies -->
  <dependency>
    <groupId>org.jboss.resteasy</groupId>
    <artifactId>resteasy-jaxrs</artifactId>
    <version>${resteasy.version}</version>
  </dependency>
  <dependency>
    <groupId>org.jboss.resteasy</groupId>
    <artifactId>resteasy-servlet-initializer</artifactId>
    <version>${resteasy.version}</version>
  </dependency>

  <!-- Test scope dependencies -->
  <dependency>
    <groupId>junit</groupId>
    <artifactId>junit</artifactId>
    <version>${junit.version}</version>
    <scope>test</scope>
  </dependency>

</dependencies>
The dependencies element lists all the library dependencies the project needs to compile and run.
The Hello World example is dependent on RESTEasy (the core library and the ServletContainerInitializer integration library) as this is the JAX-RS implementation we are using. The junit dependency has a scope of test. This means that this library is only used to run tests and is not included in the WAR.
The build element contains configuration information that defines how Maven should build the project:
<build>
    <finalName>helloworld-${project.version}</finalName>
The first item is the finalName element, which is used to name the project's WAR file.
Next we have the plugins element:
    <plugins>
        <plugin>
            <groupId>org.apache.maven.plugins</groupId>
            <artifactId>maven-compiler-plugin</artifactId>
            <version>${maven-compiler-plugin.version}</version>
            <configuration>
                <source>${source.version}</source>
                <target>${target.version}</target>
            </configuration>
        </plugin>
This section contains information about the Maven plugins that will be used to build the project. The compiler plugin, is configured to compile the project's source code into the Java 8 bytecode format.
The next plugin we need to configure is the surefire-it plugin:
        <plugin>
            <groupId>org.apache.maven.plugins</groupId>
            <artifactId>maven-surefire-plugin</artifactId>
            <version>${maven-surefire-plugin.version}</version>
            <configuration>
                <skip>true</skip>
            </configuration>
            <executions>
                <execution>
                    <id>surefire-it</id>
                    <phase>integration-test</phase>
                    <goals>
                        <goal>test</goal>
                    </goals>
                    <configuration>
                        <skip>false</skip>
                    </configuration>
                </execution>
            </executions>
        </plugin>
The surefire-it plugin controls test execution, here you can see that we have configured the plugin to not run any tests until the WAR file has been built and deployed to Jetty.
The final plug-in is the Jetty plugin:
        <plugin>
            <groupId>org.eclipse.jetty</groupId>
            <artifactId>jetty-maven-plugin</artifactId>
            <version>${jetty-maven-plugin.version}</version>
            <configuration>
                <webApp>
                    <contextPath>/</contextPath>
                </webApp>
                <scanIntervalSeconds>10</scanIntervalSeconds>
                <stopKey>alpha</stopKey>
                <stopPort>9099</stopPort>
                <stopWait>2</stopWait>
            </configuration>
            <executions>
                <execution>
                    <id>start-jetty</id>
                    <phase>pre-integration-test</phase>
                    <goals>
                        <goal>run</goal>
                    </goals>
                    <configuration>
                        <scanIntervalSeconds>0</scanIntervalSeconds>
                        <daemon>true</daemon>
                    </configuration>
                </execution>
                <execution>
                    <id>stop-jetty</id>
                    <phase>post-integration-test</phase>
                    <goals>
                        <goal>stop</goal>
                    </goals>
                </execution>
            </executions>
        </plugin>
The Jetty plugin is responsible for running (and stopping) the embedded Jetty servlet container.
Build and run the example program
The best way to learn about the RESTEasy framework is to build and run example programs. Lets start by cloning my RESTEasy examples repository:
git clone https://github.com/Robinyo/resteasy.git
Then we can build the 'Hello World' example (in the examples/helloworld directory) and run some tests:
mvn clean install
To run Jetty:
mvn jetty:run
You should see output like:
[INFO] --- jetty-maven-plugin:9.0.6.v20130930:run
[INFO] Configuring Jetty for project: helloworld
...
INFO: RESTEASY002225: Deploying javax.ws.rs.core.Application: class
  org.robferguson.resteasy.examples.helloworld.HelloWorldApplication
INFO: RESTEASY002220: Adding singleton resource
  org.robferguson.resteasy.examples.helloworld.resource.MessageResource
 ...
[INFO] Started Jetty Server
[INFO] Starting scanner at interval of 10 seconds.
In your browser navigate to:
http://localhost:8080/hello/World
You should see output like:

To stop Jetty:
mvn jetty:stop
References:
- Stackoverflow: How to install the OpenJDK for Java 1.8
- Maven Docs: Introduction to Archetypes
- Maven Docs: Introduction to the Standard Directory Layout
- RESTEasy Docs: RESTFul Web Services for Java
- Lars Vogel (Vogella.com): How to configure the usage of Git in Eclipse
- HTTPie: HTTPie: a CLI, cURL-like tool for humans
- Charles Proxy: The Charles Web Proxy
Source Code:
- GitHub: Getting started with RESTEasy