In the previous post, I wrote about the steps I followed when building a RESTful API using RESTEasy.
In this post, I'll walk you through the steps I followed when adding support for Swagger and Swagger UI to a RESTful API built using RESTEasy (packaged in a Fat JAR with an embedded Jetty instance and no web.xml).
Prerequisites
- OpenJDK for Java 1.8
- Git
- Maven (I'm using 3.3.9)
- The Eclipse IDE for Java EE Developers (I'm using Neon)
Note: This post will walk you through the steps required to install the OpenJDK. And, this post will walk you through the steps required to install Git, Maven and the Eclipse IDE.
Create a scaffold
Let's use Maven's quickstart archetype to create the scaffolding for our project:
mvn archetype:generate \
  -DarchetypeArtifactId=maven-archetype-quickstart \
  -DarchetypeVersion=1.1 \
  -DgroupId=org.robferguson.resteasy.examples.fatjar-swagger \
  -DartifactId=fatjar-swagger \
  -DarchetypeRepository=local \
  -DinteractiveMode=false
The Eclispe IDE
Follow the steps in this post to import the template into the Eclispe IDE.
Creating a Resource
We can reuse the MessageResource class from the previous post (don't forget to refactor the package name):
...

@Path("/hello")
@Produces(MediaType.TEXT_PLAIN)
@Api(value = "hello",
  description = "Endpoint for Hello specific operations")
public class MessageResource {

  @GET
  @Path("/{param}")
  @ApiOperation(value = "Returns param", notes = "Returns param",
    response = MessageResource.class)
  @ApiResponses(value = {
    @ApiResponse(code = 200,
      message = "Successful retrieval of param value",
      response = MessageResource.class) })
  public Response printMessage(@PathParam("param") String msg) {
    String result = "Hello " + msg + "!";
    return Response.status(200).entity(result).build();
  }
}
I have also added some Swagger annotations (@Api, @ApiOperation, @ApiResponses and @ApiResponse) to document the API.
Registering a Resource
We can extend the javax.ws.rs.core.Application class in order to tell RESTEasy which classes we want to register:
...

public class FatJarApplication extends Application {

  ...

  public FatJarApplication() {
    configureSwagger();
  }

  @Override
  public Set<Class<?>> getClasses() {

    HashSet<Class<?>> set = new HashSet<Class<?>>();

    set.add(MessageResource.class);
    set.add(io.swagger.jaxrs.listing.ApiListingResource.class);
    set.add(io.swagger.jaxrs.listing.SwaggerSerializers.class);

    return set;
  }
The getClasses() method returns a list of JAX-RS service classes (i.e., MessageResource) and providers (i.e., ApiListingResource and SwaggerSerializers). Any JAX-RS service class returned by this method will follow the per-request model. When RESTEasy determines that a HTTP request needs to be delivered to a method of one of these classes, an instance of it will be created for the duration of the request.
We can also use the Application class to configure Swagger:
  private void configureSwagger() {
    BeanConfig beanConfig = new BeanConfig();
    beanConfig.setVersion("1.0.0");
    beanConfig.setSchemes(new String[] { "http" });
    beanConfig.setHost("localhost:8080");
    beanConfig.setBasePath("/api");
    beanConfig.setResourcePackage(
      MessageResource.class.getPackage().getName());
    beanConfig.setTitle("RESTEasy, ...");
    beanConfig.setDescription("Sample application to demonstrate ...");
    beanConfig.setScan(true);
  }
Note: We're not using the @ApplicationPath annotation, because we are going to set the application path ("/api") using an initialisation parameter in our Main class (see below).
Embedding Jetty
To embed Jetty our RESTful API needs to create a server instance, configure the server and then start the server. We'll do that in the Main classes run() method:
  static final String APPLICATION_PATH = "/api";
  static final String CONTEXT_ROOT = "/";

  public void run() throws Exception
  {
    final int port = 8080;
    final Server server = new Server(port);

    // Setup the basic Application "context" at "/".
    // This is also known as the handler tree (in Jetty speak).
    final ServletContextHandler context = new ServletContextHandler(
      server, CONTEXT_ROOT);

    // Setup RESTEasy's HttpServletDispatcher at "/api/*".
    final ServletHolder restEasyServlet = new ServletHolder(
      new HttpServletDispatcher());
    restEasyServlet.setInitParameter("resteasy.servlet.mapping.prefix",
      APPLICATION_PATH);
    restEasyServlet.setInitParameter("javax.ws.rs.Application",
      "org.robferguson.resteasy.examples.fatjar.FatJarApplication");
    context.addServlet(restEasyServlet, APPLICATION_PATH + "/*");

    // Setup the DefaultServlet at "/".
    final ServletHolder defaultServlet = new ServletHolder(
      new DefaultServlet());
    context.addServlet(defaultServlet, CONTEXT_ROOT);

    // Set the path to our static (Swagger UI) resources
    String resourceBasePath = Main.class.getResource(
      "/swagger-ui").toExternalForm();
    context.setResourceBase(resourceBasePath);
    context.setWelcomeFiles(new String[] { "index.html" });

    server.start();
    server.join();
  }
We start by creating a server instance:
final Server server = new Server(port);
The org.eclipse.jetty.server.Server class is the main class for the Jetty HTTP Servlet server. It is responsible for aggregating Connectors (HTTP request receivers) and request Handlers (the Jetty HTTP Servlet server, is itself, a handler and a ThreadPool). Connectors use ThreadPool methods to run jobs that will eventually call the handle() method.
    // Setup the basic Application "context" at "/".
    // This is also known as the handler tree (in Jetty speak).
    final ServletContextHandler context = new ServletContextHandler(
      server, CONTEXT_ROOT);
A Handler instance is required by Jetty's HTTP Servlet server to handle incoming HTTP requests. Handlers are passed the servlet API's request and response objects. A Context Handler wraps a call to handle a request, by setting the context and servlet path, and setting the context class loader. A Servlet Context Handler extends the ContextHandler class to allow for the construction of a context with a ServletHandler and optionally session and security handlers.
    // Setup RESTEasy's HttpServletDispatcher at "/api/*".
    final ServletHolder restEasyServlet = new ServletHolder(
      new HttpServletDispatcher());
    restEasyServlet.setInitParameter("resteasy.servlet.mapping.prefix",
      APPLICATION_PATH);
    restEasyServlet.setInitParameter("javax.ws.rs.Application",
      "org.robferguson.resteasy.examples.fatjar.FatJarApplication");
    context.addServlet(restEasyServlet, APPLICATION_PATH + "/*");
To use the javax.ws.rs.core.Application class you must set the javax.ws.rs.Application servlet init-param (e.g., "org.robferguson.resteasy.examples.fatjar.FatJarApplication"). We can use the org.eclipse.jetty.servlet.ServletHolder class to pass initialisation parameters to RESTEasy's HttpServletDispatcher.
    // Setup the DefaultServlet at "/".
    final ServletHolder defaultServlet = new ServletHolder(
      new DefaultServlet());
    context.addServlet(defaultServlet, CONTEXT_ROOT);
A DefaultServlet at "/" is a requirement of the servlet specification.
    // Set the path to our static (Swagger UI) resources
    String resourceBasePath = Main.class.getResource(
      "/swagger-ui").toExternalForm();
    context.setResourceBase(resourceBasePath);
    context.setWelcomeFiles(new String[] { "index.html" });

    server.start();
    server.join();
To use Swagger UI we need to let the ServletContextHandler know where to find our static resources, then we're ready to start the server.
We also need to provide an entry point (i.e., a main method) for our application:
...

public class Main {

  ...

  public Main() {}

  public static void main( String[] args ) throws Exception
  {
    try
    {
      new Main().run();
    }
    catch (Throwable t)
    {
      t.printStackTrace();
    }
  }

  public void run() throws Exception
  {
      ...
  }
}
Note: We're configuring Jetty in our code so we don't require a WEB-INF/web.xml.
The POM.XML
Let’s take a look at the Fat JAR Swagger example's pom.xml.
The dependencies element lists all the library dependencies the project needs to compile and run:
<dependencies>

  ...

  <!-- Swagger runtime dependencies -->
  <dependency>
    <groupId>io.swagger</groupId>
    <artifactId>swagger-jaxrs</artifactId>
    <version>${swagger.version}</version>
  </dependency>

  ...

</dependencies>
The plugins element contains information about the Maven plugins that will be used to build the project:
    <plugins>

      ...

      <plugin>
        <groupId>com.googlecode.maven-download-plugin</groupId>
        <artifactId>download-maven-plugin</artifactId>
        <version>${download-maven-plugin.version}</version>
        <executions>
          <execution>
            <id>swagger-ui</id>
            <phase>validate</phase>
            <goals>
              <goal>wget</goal>
            </goals>
            <configuration>
              <url>
        https://github.com/swagger-api/swagger-ui/archive/master.tar.gz
              </url>
              <unpack>true</unpack>
              <outputDirectory>
                ${project.build.directory}
              </outputDirectory>
            </configuration>
          </execution>
        </executions>
      </plugin>
The download-maven-plugin is responsible for downloading and unpacking Swagger UI.
      <plugin>
        <groupId>org.apache.maven.plugins</groupId>
        <artifactId>maven-resources-plugin</artifactId>
        <version>${maven-resources-plugin.version}</version>
        <executions>
          <execution>
            <id>copy-resources</id>
            <phase>initialize</phase>
            <goals>
              <goal>copy-resources</goal>
            </goals>
            <configuration>
              <outputDirectory>
                ${basedir}/src/main/resources/swagger-ui
              </outputDirectory>
              <resources>
                <resource>
                  <directory>
                    ${project.build.directory}/swagger-ui-master/dist
                  </directory>
                </resource>
              </resources>
            </configuration>
          </execution>
        </executions>
      </plugin>

      ...

    <plugins>
The maven-resources-plugin is responsible for copying the contents of Swagger UI's dist directory into the sample applications's src/main/resources directory.
Build and run the example program
The best way to learn about the RESTEasy framework is to build and run example programs. Lets start by cloning my RESTEasy examples repository:
git clone https://github.com/Robinyo/resteasy.git
To download and unpack Swagger UI (in the examples/fatjar-swagger directory):
mvn clean package
To build the 'Fat JAR Swagger' example and run some tests:
mvn clean install
To run the example:
java -jar target/fatjar-swagger-1.0-SNAPSHOT.jar
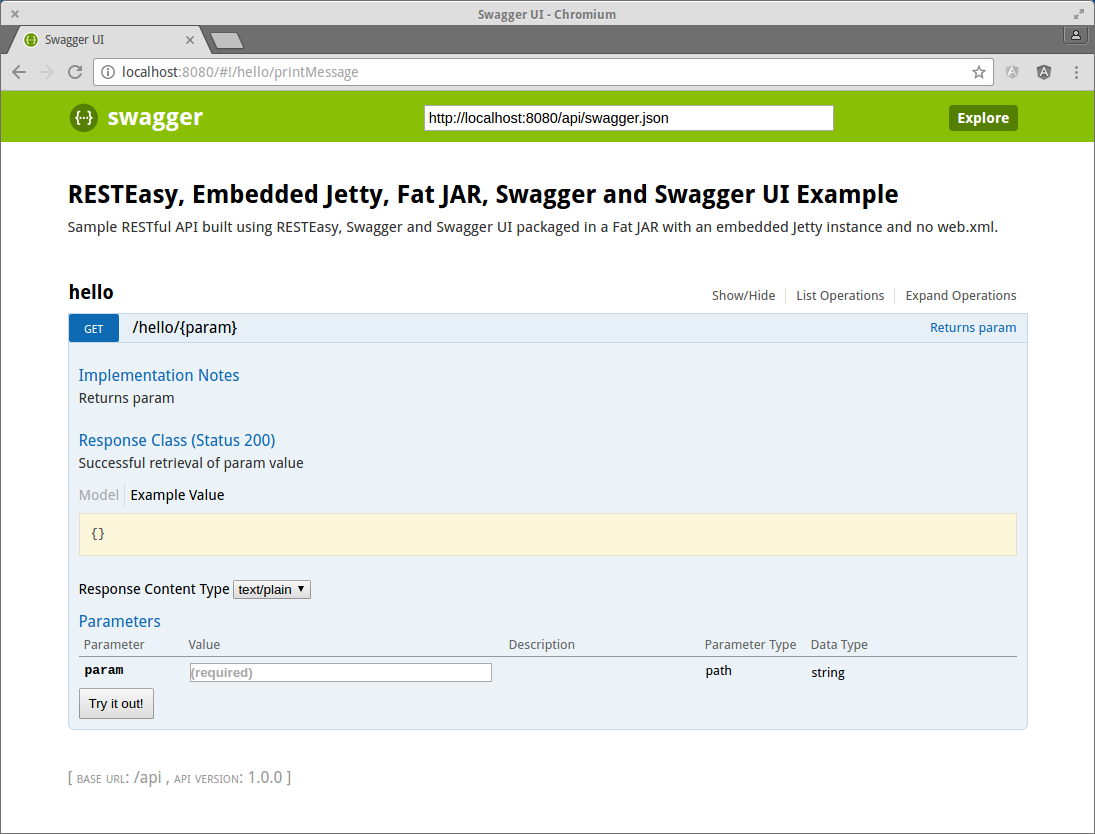
In your browser navigate to:
http://localhost:8080
You should see output like:

References:
- Jetty Docs: Embedding Jetty
- Jetty Project (GitHub): Example of an Uber JAR (Fat JAR) to start a server using Embedded Jetty
- Jetty Project (GitHub): Short examples of various features of Embedded Jetty
- Swagger Docs: Swagger RESTEasy Setup
- Swagger Docs: Swagger Annotations
- Stack Overflow: Steps to generate Swagger RESTful API documentation
Source Code:
- GitHub: Getting started with RESTEasy