
In a previous post, I wrote about Raspberry Pi 2 Model B headless setup.
In this post, I'll walk you through the steps I followed when setting up my Raspberry Pi 3 PicoCluster.
We'll cover the following items:
- Hardware
- Operating System
- Networking
- Key-based authentication
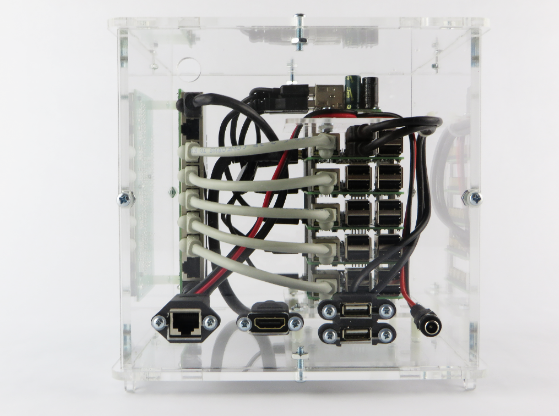
Hardware
My cube contains five Raspberry Pi 3s (with heat sinks), five 64GB micro SD cards, an 8-port gigabit ethernet switch, power, casing and cabling:
Operating System
My cube's micro SD cards were imaged with the PicoCluster Cluster Image Set. This is basically the stock Raspbian Jessie image, configured so that all the nodes can see each other.
To find the distribution version, run the following command:
lsb_release -a
You should see output like:
No LSB modules are available.
Distributor ID: Raspbian
Description:    Raspbian GNU/Linux 8.0 (jessie)
Release:        8.0
Codename:       jessie
To find the kernel version, run the following command:
uname -a
You should see output like:
Linux pc0 4.4.26-v7+ #915 SMP Thu Oct 20 17:08:44 BST 2016 armv7l GNU/Linux
Note: Raspbian is not your only container OS option you should also take a look at HypriotOS and ResinOS. And, to burn images to SD cards checkout Etcher (by resin.io) and Hypriot's flash tool.
Networking
Debian's adoption of systemd has changed the way networking works, the new configuration (based on dhcpcd) has many advantages and is recommended for new users.
The PicoCluster Cluster Image Set's default (static) IP addresses are:
10.1.10.240 pc0
10.1.10.241 pc1
10.1.10.242 pc2
10.1.10.243 pc3
10.1.10.244 pc4
However, my home network's default gateway address is 192.168.1.1 so after I connected the cube to my network I then had to SSH (you can find the IP addresses on your router's status page) into each node (the default username is picocluster, the default password is picocluster):
ssh picocluster@192.168.1.8
and update the network interfaces file:
sudo nano /etc/network/interfaces
as follows:
...
iface eth0 inet manual
...
and update the DHCP client configuration:
sudo nano /etc/dhcpcd.conf
For example, for pc0:
...
interface eth0
static ip_address=192.168.1.240/24
static routers=192.168.1.1
static domain_name_servers=192.168.1.1
We also need to update the hosts file:
sudo nano /etc/hosts
as follows:
...
192.168.1.240 pc0
192.168.1.241 pc1
192.168.1.242 pc2
192.168.1.243 pc3
192.168.1.244 pc4
...
Note: Don't forget to update the computer you wish to log in from's hosts file, too.
Its always a good idea to change the default password:
passwd
And, remember to shutdown and restart each node:
sudo shutdown -r now
Key-based authentication
When your working with multiple remote hosts you don't want to type in your password every single time. The following section will show you how to setup SSH passwordless authentication.
Generating SSH keys
SSH keys should be generated on the computer you wish to log in from. I'm logging in from Elementary OS Freya (running in VirtualBox on my MacBook Pro).
First, let's check for any existing SSH keys
ls -al ~/.ssh
You should see output like:
drwx------  2 rob rob 4096 Nov 10 14:38 .
drwxr-xr-x 32 rob rob 4096 Nov  7 16:57 ..
-rw-rw-r--  1 rob rob  237 Apr 17  2016 config
-rw-------  1 rob rob 1675 Apr 13  2016 id_rsa
-rw-r--r--  1 rob rob  400 Apr 13  2016 id_rsa.pub
-rw-r--r--  1 rob rob 4662 Nov  9 17:17 known_hosts
You can also try:
for keyfile in ~/.ssh/id_*; do ssh-keygen -l -f "${keyfile}"; done | uniq
You should see output like:
2048 01:b9:c5:e1:30:be:53:3c:fc:a2:94:a2:ac:d1:a0:95 rob@rob-VirtualBox (RSA)
I want to keep my current 2048 bit RSA key:
mv ~/.ssh/id_rsa ~/.ssh/id_rsa_legacy
mv ~/.ssh/id_rsa.pub ~/.ssh/id_rsa_legacy.pub
And, generate a new 4096 bit RSA key:
ssh-keygen -t rsa -b 4096 -o -a 100
You should see output like:
Generating public/private rsa key pair.
Enter file in which to save the key (/home/rob/.ssh/id_rsa):
Enter passphrase (empty for no passphrase):
Enter same passphrase again:
Your identification has been saved in /home/rob/.ssh/id_rsa.
Your public key has been saved in /home/rob/.ssh/id_rsa.pub.
The key fingerprint is:
SHA256: [...] rob@rob-VirtualBox
The key's randomart image is: [...]
Don't forget to add the SSH keys to your ssh-agent:
ssh-add ~/.ssh/id_rsa ~/.ssh/id_rsa_legacy
Now we're ready to copy the new RSA public key to the remote host (repeat for each node):
ssh-copy-id -i ~/.ssh/id_rsa.pub picocluster@pc0
This command will start a SSH session that will prompt you for your (the picocluster user's) password. After you enter the password, it will copy the public key (id_rsa.pub) to the remote host's authorized_keys file.
To test the new settings, open a terminal window and login:
ssh picocluster@pc0
Create a SSH config file
You can make things a little easier on yourself by setting up a SSH configuration file:
sudo nano ~/.ssh/config
Here's what mine looks like:
IdentityFile ~/.ssh/id_rsa
IdentityFile ~/.ssh/id_rsa_legacy

Host manager
     HostName pc0
     Port     22
     User     picocluster

Host worker-1
     HostName pc1
     Port     22
     User     picocluster

Host worker-2
     HostName pc2
     Port     22
     User     picocluster

Host worker-3
     HostName pc3
     Port     22
     User     picocluster

Host worker-4
     HostName pc4
     Port     22
     User     picocluster
...
Now, I just need to enter the following command to connect to my cluster's manager node (pc0):
ssh manager
Which is fewer key strokes and much easier to remember.
What's Next
In the next post, I'll walk you through the steps I followed when setting up Docker Swarm Mode on my Raspberry Pi 3 PicoCluster.
References:
- Rob Ferguson: Raspberry Pi 2 Model B Headless Setup
- Gert van Dijk's Blog: Upgrade your SSH keys!
- Raspberry Pi Stack Exchange: How do I set up networking/WiFi/Static IP